SecurITaas Windows Integration Guide
Introduction
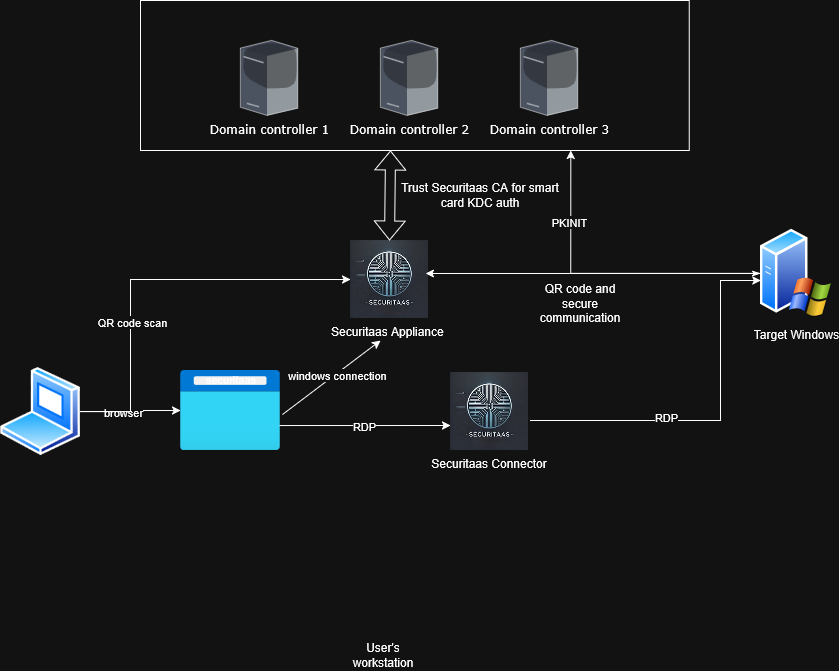
This document provides step-by-step instructions for configuring Windows domain controllers and target Windows servers to work with SecurITaas FIDO authentication using smart cards. This includes setting up trust relationships, installing credential providers, and procedures for uninstalling these configurations.
Note: All steps in this guide require Domain Administrator privileges on domain controllers and local Administrator privileges on target Windows servers.
Prerequisites
Before beginning, ensure you have:
- Access to SecurITaas server (ports 443 and 9001)
- Administrator credentials for SecurITaas web application
- Domain Administrator access to all domain controllers
- Local Administrator access to target Windows servers
- SecurITaas certificate utility executable (
securitaas_cert_utility.exe) - SecurITaas Credential Provider installer (
securitaascpinstaller.exe) - Network connectivity between administrative workstation and all target systems
1. Configure Each Domain Controller to Trust SecurITaas CA
This section covers configuring domain controllers to trust the SecurITaas Certificate Authority (CA) for KDC (Key Distribution Center) certificate authentication.
1.1 Gather Domain Controller Details and Generate KDC Certificate
For each domain controller in your environment, you need to generate a KDC certificate using the SecurITaas certificate utility.
Step 1: Collect Domain Controller Information
Before running the certificate utility, gather the following information for each domain controller:
- DC FQDN: Fully Qualified Domain Name (e.g.,
DC01.securitaas.com) - Domain Name: Active Directory domain name (e.g.,
securitaas.com) - NetBIOS Name: NetBIOS domain name (e.g.,
SECURITAAS) - SecurITaas Server IP/FQDN: IP address or FQDN of your SecurITaas server
- Administrator Credentials: Email and password for SecurITaas web application
Step 2: Run SecurITaas Certificate Utility
- Launch the Certificate Utility:
- Open a command prompt or PowerShell session on your workstation or laptop. This can only be run from a laptop or endpoint with soagent installed. Please use soadmin user's credentials for this.
- Navigate to the directory containing the SecurITaas certificate utility executable
-
Run the utility:
securitaas_cert_utility.exe -
Authenticate with SecurITaas Server:
- When prompted, enter the following:
- SecurITaas Server IP or FQDN: Enter your SecurITaas server address
- Email: Enter your SecurITaas administrator email
- Password: Enter your SecurITaas administrator password
-
The utility will authenticate and register an agent automatically
-
Select KDC Certificate Generation:
-
From the main menu, select option 1 (Generate KDC Certificate)
-
Enter Domain Controller Information:
- DC FQDN: Enter the fully qualified domain name of the domain controller
- Example:
DC01.securitaas.com
- Example:
- Domain: Enter the Active Directory domain name
- Example:
securitaas.com
- Example:
- NetBIOS Name: Enter the NetBIOS domain name (uppercase)
- Example:
SECURITAAS
- Example:
- Key Size (optional): Press Enter for default (2048) or enter a custom value
-
Valid Years (optional): Press Enter for default (2.5) or enter a custom value
-
Certificate Generation:
- The utility will generate the KDC certificate and save it as a PFX file
- The file will be saved in the same directory as the utility with the naming format:
Example:
<NETBIOS_NAME>_kdc_<TIMESTAMP>.pfxSECURITAAS_kdc_20241215_143022.pfx -
Note: The PFX file is unencrypted (no password required)
-
Repeat for Each Domain Controller:
- Repeat steps 1-5 for each domain controller in your environment
- Keep track of which PFX file corresponds to which domain controller
Step 3: Import KDC Certificate on Domain Controller
For each domain controller:
- Transfer the PFX File:
- Copy the generated PFX file to the domain controller
-
Ensure you have administrative access to the domain controller
-
Import the Certificate:
- Open a command prompt as Administrator on the domain controller
- Navigate to the directory containing the PFX file
- Import the certificate using certutil:
Example:
certutil -importPFX <PFX_FILENAME>.pfxcertutil -importPFX SECURITAAS_kdc_20241215_143022.pfx -
The certificate will be imported into the local machine's Personal certificate store
-
Verify Certificate Import:
- Open Certificate Manager (certlm.msc) or MMC with Certificates snap-in
- Navigate to Personal > Certificates
-
Verify the KDC certificate is present and shows:
- Intended Purpose: Server Authentication, KDC Authentication
- Issued By: SecurITaas CA
- Issued To: The DC FQDN you specified
-
Configure Certificate for KDC:
- The certificate should automatically be used by the KDC service
-
Restart the KDC service if needed:
net stop kdc net start kdc -
Verify KDC Certificate Acceptance (Optional):
-
Restart KDC Service:
- Open Services console (services.msc) or use Command Prompt as Administrator
- Restart the KDC service:
net stop kdc
net start kdc
-
Check Event Logs for Certificate Acceptance:
- Open Event Viewer (eventvwr.msc)
- Navigate to Windows Logs > System
- Filter the log for events from the KDC source:
- Click Filter Current Log... (or right-click System and select Filter Current Log...)
- Under Event sources, check KDC
- Click OK
- Look for event ID 4 (KDC certificate loaded successfully) or similar success messages
- Verify the event log shows the SecurITaas-issued KDC certificate is being used
- You should see messages indicating the certificate was found and loaded
-
Enable Detailed KDC Logging (if needed):
- If you need more detailed logging, you can enable it through Group Policy:
- Open Group Policy Management (gpmc.msc)
- Navigate to your domain's Group Policy Object (e.g., Default Domain Policy)
- Edit the policy and navigate to:
Computer Configuration > Policies > Administrative Templates > System > KDC - Enable KDC support for claims, compound authentication and Kerberos armoring
- This will provide more detailed logging in Event Viewer
-
If Certificate Not Found in Logs:
- Verify the certificate is still in the Personal store (repeat step 3)
- Ensure the certificate subject name matches the DC FQDN exactly
- Check that the certificate has not expired
- Restart the KDC service again:
net stop kdc net start kdc - Wait a few moments and check the event logs again
1.2 Import SecurITaas CA Certificate into NTAuth Store
The SecurITaas CA certificate must be imported into the Enterprise NTAuth store so that all domain controllers trust certificates issued by SecurITaas.
Step 1: Obtain SecurITaas CA Certificate
- Using the Certificate Utility:
- Run the SecurITaas certificate utility
- Authenticate with your SecurITaas server credentials
- From the main menu, select option 2 (Get CA Certificate)
-
The CA certificate will be saved as:
Example:securitaas-ca_<TIMESTAMP>.cersecuritaas-ca_20241215_143500.cer -
Alternative Method - From SecurITaas Web Interface:
- Log in to the SecurITaas web application
- Navigate to the certificate management section
- Download the root CA certificate in
.cerformat
Step 2: Import CA Certificate into NTAuth Store (Method 2 - Using Certutil)
This method uses certutil.exe to publish the CA certificate to the Enterprise NTAuth store, which automatically replicates to all domain controllers.
- Open Command Prompt as Administrator:
- On any domain controller or a workstation with Domain Admin privileges
-
Right-click Command Prompt and select Run as administrator
-
Publish CA Certificate to Enterprise NTAuth Store:
- Navigate to the directory containing the SecurITaas CA certificate
- Run the following command:
Example:
certutil -dspublish -f securitaas-ca_<TIMESTAMP>.cer NTAuthCAcertutil -dspublish -f securitaas-ca_20241215_143500.cer NTAuthCA -
This command publishes the certificate to Active Directory, which will replicate to all domain controllers
-
Verify Publication:
- The command should output confirmation that the certificate was published
-
You should see a message indicating successful publication to the NTAuthCertificates container
-
Update Local NTAuth Store (if needed):
- On each domain controller, you may need to update the local registry:
certutil -enterprise -addstore NTAuth securitaas-ca_<TIMESTAMP>.cer -
This ensures the certificate is immediately available on the local machine
-
Verify Certificate in NTAuth Store:
- To view certificates in the NTAuth store:
certutil -viewstore NTAuth -
You should see the SecurITaas CA certificate listed
-
Replication Verification:
- Wait for Active Directory replication to complete (typically a few minutes)
- On other domain controllers, verify the certificate is present:
certutil -viewstore NTAuth - All domain controllers should show the SecurITaas CA certificate
Step 3: Additional Configuration (Optional but Recommended)
- Import CA Certificate to Trusted Root Certification Authorities:
-
On each domain controller, import the CA certificate to the Trusted Root Certification Authorities store:
certutil -addstore Root securitaas-ca_<TIMESTAMP>.cer -
Verify Group Policy Distribution:
- The NTAuth store certificate should automatically be distributed via Group Policy
- You can verify this in Group Policy Management:
- Navigate to Default Domain Policy > Computer Configuration > Policies > Windows Settings > Security Settings > Public Key Policies > Trusted Root Certification Authorities
- The SecurITaas CA certificate should appear here
2. Configure Target Windows (Domain-Joined Servers) for SecurITaas FIDO Authentication
This section covers installing the SecurITaas Credential Provider on target Windows servers to enable FIDO authentication with smart cards.
2.1 Install the Credential Provider Using SecurITaasCPInstaller
The SecurITaas Credential Provider enables smart card authentication on Windows servers using SecurITaas FIDO tokens.
Step 1: Prepare for Installation
- Verify Prerequisites:
- Ensure the target Windows server is domain-joined
- Verify you have local Administrator privileges on the target server
- Confirm network connectivity to the SecurITaas authentication server
-
Note the SecurITaas server IP address and port number (default port: 9001)
-
Obtain Installation Files:
- Ensure you have the
securitaascpinstaller.exeexecutable - Ensure the
RDPQRProvider.dllfile is in the same directory as the installer - Transfer both files to the target server
Step 2: Run the Installer
- Open Command Prompt as Administrator:
- Log in to the target Windows server
- Right-click Command Prompt and select Run as administrator
-
Important: The installer must be run with Administrator privileges
-
Navigate to Installer Directory:
-
Change to the directory containing
securitaascpinstaller.exe:cd C:\Path\To\Installer -
Execute Installation:
- Run the installer with the following syntax:
Example:
securitaascpinstaller.exe install <ServerIP> <Port>securitaascpinstaller.exe install 172.31.46.149 9001 - Replace
<ServerIP>with the IP address or FQDN of your SecurITaas authentication server -
Replace
<Port>with the port number (typically 9001) -
Monitor Installation Process:
- The installer will perform the following operations:
- Store authentication server configuration in registry
- Encrypt and store registration credentials in registry
- Copy
RDPQRProvider.dlltoC:\Windows\System32\ - Register the DLL as a COM component
- Register the Credential Provider in Windows registry
-
You should see progress messages for each step
-
Verify Installation:
- The installer will display "Installation Complete!" when finished
- Note the message indicating a restart is required
Step 3: Configure Server for QR Code Logon UI
Before restarting, configure the server to disable Network Level Authentication (NLA) and ensure the logon UI is displayed for QR code authentication:
- Disable Network Level Authentication (NLA) via System Properties:
- Open System Properties:
- Press
Win + R, typesysdm.cpl, and press Enter - Or right-click This PC (or My Computer) > Properties > Advanced system settings
- Press
- Navigate to the Remote tab
- Under Remote Desktop, select Allow remote connections to this computer
- Uncheck the option "Allow connections only from computers running Remote Desktop with Network Level Authentication"
- Click OK to save the changes
- If prompted, click OK on any warning dialogs
-
Note: This allows the logon UI to be displayed instead of prompting for credentials before connection
-
Disable Network Level Authentication (NLA) via Group Policy (Recommended if System Properties method doesn't work):
If users still see credential prompts after disabling NLA via System Properties, configure it through Group Policy:
Option A - Using Local Group Policy Editor (for standalone servers):
- Open Local Group Policy Editor:
- Press Win + R, type gpedit.msc, and press Enter
- Note: Local Group Policy Editor is only available on Windows Pro, Enterprise, or Server editions
- Navigate to the following path:
Computer Configuration > Administrative Templates > Windows Components > Remote Desktop Services > Remote Desktop Session Host > Security
Option B - Using Domain Group Policy (for domain-joined servers): - On a domain controller or a machine with Group Policy Management Tools installed, open Group Policy Management (gpmc.msc) - Navigate to your domain or create/edit a Group Policy Object (GPO) that applies to the target servers - Right-click the GPO and select Edit - Navigate to:
Computer Configuration > Policies > Administrative Templates > Windows Components > Remote Desktop Services > Remote Desktop Session Host > Security
gpupdate /force
Option C - Using Registry (if Group Policy Editor is not available): - Open Registry Editor (regedit.exe) as Administrator - Navigate to:
HKEY_LOCAL_MACHINE\SYSTEM\CurrentControlSet\Control\Terminal Server\WinStations\RDP-Tcp
SecurityLayer
- Value: 1 (This disables NLA)
- If the value doesn't exist, right-click in the right pane > New > DWORD (32-bit) Value > Name it SecurityLayer > Set value to 1
- Close Registry Editor
- Note: Registry changes require a restart or service restart to take effect
Verify NLA is Disabled: - After applying Group Policy or registry changes, verify the setting: - Open Command Prompt as Administrator - Run:
reg query "HKLM\SYSTEM\CurrentControlSet\Control\Terminal Server\WinStations\RDP-Tcp" /v SecurityLayer
0x0 (0) if NLA is disabled
- If it shows 0x1 (1) or 0x2 (2), NLA is still enabled and you may need to restart the server
- Enable Remote Desktop (if not already enabled):
-
In the same Remote tab of System Properties:
- Ensure Allow remote connections to this computer is selected
- If you need to allow connections from any version of Remote Desktop, you can also configure firewall rules if needed
-
Verify Remote Desktop Service is Running:
- Open Services console (services.msc)
- Locate Remote Desktop Services service
- Ensure it is set to Automatic and is Running
- If not running, right-click and select Start
- If startup type is not Automatic, right-click > Properties > Set Startup type to Automatic > OK
Step 4: Post-Installation Steps
- Restart the Server:
- Important: You must restart the server for the Credential Provider to be active
- The installer will display: "IMPORTANT: You must restart your computer for changes to take effect!"
-
Restart the server:
shutdown /r /t 0 -
Verify Credential Provider Registration:
-
After restart, verify the Credential Provider is registered:
- You can verify by checking the logon screen (see step 3)
-
Test QR Code Authentication:
- Connect to the server via Remote Desktop from a client machine
- Important: With NLA disabled, you should see the Windows logon screen immediately without being prompted for credentials first
- At the logon screen, you should see the option "Logon using Securitaas"
- The QR code should be displayed for authentication
- Scan the QR code with your SecurITaas FIDO token or mobile app
- Verify successful logon
Step 5: Repeat for Additional Servers
- Repeat steps 1-4 for each target Windows server that needs SecurITaas FIDO authentication
3. Just in Time Provisioning for Windows Servers
This section covers configuring OpenSSH Server on Windows target servers to enable just-in-time (JIT) provisioning and deprovisioning of user access. This allows SecurITaas to automatically provision users to local or domain groups when they request access and remove them when sessions close.
Overview
Just-in-time provisioning enables: - Automatic user provisioning: When a user clicks "Connect" on the Request Connection page, SecurITaas automatically adds the user to the required local or domain group - Automatic deprovisioning: When the session closes, the user is automatically removed from the group - Passwordless authentication: Uses SSH certificate-based authentication with ephemeral certificates - Zero standing privileges: Users only have access during active sessions
Prerequisites
Before configuring JIT provisioning, ensure:
- Target Windows server is domain-joined (for domain group provisioning) or standalone (for local group provisioning)
- Administrator access to the target Windows server
- Access to SecurITaas Appliance Manager
- Port 22 is open from SecurITaas appliance to the target Windows server (see Port Requirements)
- A local or domain user account configured in the Device page for passwordless provisioning operations
3.1 Install OpenSSH Server
OpenSSH Server can be installed on Windows Server 2019 and later, or Windows 10/11. Choose one of the following methods:
Method 1: Install OpenSSH Server via PowerShell (Command Line)
- Open PowerShell as Administrator:
- Press
Win + Xand select Windows PowerShell (Admin) or Terminal (Admin) -
Or right-click Start button and select Windows PowerShell (Admin)
-
Check if OpenSSH Server is already installed:
Get-WindowsCapability -Online | Where-Object Name -like 'OpenSSH.Server*' - If you see
State : Installed, OpenSSH Server is already installed -
If you see
State : NotPresent, proceed with installation -
Install OpenSSH Server:
Add-WindowsCapability -Online -Name OpenSSH.Server~~~~0.0.1.0 - Wait for the installation to complete
-
You should see output indicating successful installation
-
Start and configure OpenSSH Server:
Start-Service sshd Set-Service -Name sshd -StartupType 'Automatic' -
Verify the service is running:
Get-Service sshd - The status should show
Running
Method 2: Install OpenSSH Server via Settings UI
- Open Settings:
- Press
Win + Ito open Settings -
Or click Start > Settings
-
Navigate to Apps:
- Click Apps (or Apps & features on older Windows versions)
-
Click Optional features (or Manage optional features)
-
Add OpenSSH Server:
- Click Add a feature (or + Add a feature)
- In the search box, type
OpenSSH - Select OpenSSH Server
- Click Install
-
Wait for installation to complete
-
Start the OpenSSH Server service:
- Open Services console (services.msc)
- Locate OpenSSH SSH Server
- Right-click and select Start
- Right-click again and select Properties
- Set Startup type to Automatic
-
Click OK
-
Verify the service is running:
- In Services console, verify OpenSSH SSH Server shows status as Running
3.2 Configure Firewall Rule for SSH
Firewall rules for SSH (port 22) can be configured either through Windows Firewall on the target server or through an external firewall (network firewall, cloud security groups, etc.). Choose the method that best fits your environment.
Option A: Configure via Windows Firewall
- Open Windows Defender Firewall with Advanced Security:
- Press
Win + R, typewf.msc, and press Enter -
Or search for "Windows Defender Firewall with Advanced Security" in Start menu
-
Create Inbound Rule:
- Click Inbound Rules in the left pane
- Click New Rule... in the right pane
- Select Port and click Next
- Select TCP and enter port 22
- Click Next
- Select Allow the connection and click Next
- Check all profiles (Domain, Private, Public) and click Next
- Enter a name:
OpenSSH Server (SSH) -
Click Finish
-
Restrict SSH Access to SecurITaas Appliance (Recommended):
- Important: For security best practices, it is recommended to restrict SSH access to only the SecurITaas appliance IP address
- Right-click the newly created rule OpenSSH Server (SSH)
- Select Properties
- Navigate to the Scope tab
- Under Remote IP address, select These IP addresses:
- Click Add...
- Enter the IP address or IP address range of your SecurITaas appliance
- Click OK
- Click OK to save the changes
-
Note: This ensures only the SecurITaas appliance can connect via SSH, preventing unauthorized access attempts
-
Configure Provisioning User Permissions:
- The provisioning user account configured in the Device page should have limited permissions:
- Required: Permissions to add/remove users from local or domain groups
- Not Required: Remote Desktop access or interactive logon rights
- Recommended: Create a dedicated service account with minimal privileges (only group management permissions)
- This ensures the provisioning user can only perform group membership changes and cannot be used for interactive access to the server
-
Security Benefit: Even if the provisioning user credentials were compromised, an attacker would only be able to modify group memberships, not gain direct access to the server
-
Verify the rule is active:
- In the Inbound Rules list, verify the new rule is enabled (green checkmark)
- Verify the scope shows only the SecurITaas appliance IP address(es)
Option B: Configure via External Firewall
If you prefer to manage firewall rules through an external firewall (network firewall, cloud security groups, etc.):
- Configure Inbound Rule:
- Access your external firewall management interface
- Create a new inbound rule allowing TCP port 22
- Important: Restrict the source IP address to only your SecurITaas appliance IP address(es)
-
Apply the rule to the target Windows server(s)
-
Verify Connectivity:
- From the SecurITaas appliance, test SSH connectivity to the target server:
Test-NetConnection -ComputerName <target_server_ip> -Port 22 -
Ensure the connection is successful
-
Security Best Practice:
- Always restrict SSH access (port 22) to only the SecurITaas appliance IP address
- Avoid allowing SSH from any source (0.0.0.0/0) for security reasons
3.3 Download and Configure SecurITaas Public Key
- Access SecurITaas Appliance Manager:
- Log in to the SecurITaas web application
- Navigate to Support > Appliance Manager
- Click Generate Token and copy the token
- Launch the Appliance Manager executable
- Enter:
- IP of your SecurITaas appliance
- Port 9090
- Paste the token in the 'Bearer Token' box
- Select 'Appliance Manager' from the dropdown
- Click Connect
-
For detailed instructions, see Logging into Appliance Manager
-
Download securitaas.pub:
- In Appliance Manager, click Navigator on the left
- Navigate to
/home/user0/Certificates/CA - Locate the file named
securitaas.pub - Download or copy the contents of this file
-
Note: This is the public key of the SecurITaas Certificate Authority used to sign ephemeral SSH certificates
-
Create SSH Configuration Directory:
- Open PowerShell or Command Prompt as Administrator
- The default SSH directory on Windows is
C:\ProgramData\ssh - Verify the directory exists:
Test-Path C:\ProgramData\ssh -
If it doesn't exist, create it:
New-Item -ItemType Directory -Path C:\ProgramData\ssh -Force -
Place securitaas.pub in SSH Directory:
- Copy the
securitaas.pubfile toC:\ProgramData\ssh\securitaas.pub - You can use PowerShell:
# If you have the file content, create it: Set-Content -Path C:\ProgramData\ssh\securitaas.pub -Value "<paste_pub_key_content_here>" -
Or copy the file using File Explorer:
- Navigate to
C:\ProgramData\ssh(you may need to show hidden items) - Paste the
securitaas.pubfile here
- Navigate to
-
Set File Permissions:
- Right-click
securitaas.pubin File Explorer - Select Properties > Security tab
- Click Edit
- Ensure SYSTEM and Administrators have Read permissions
- Remove any unnecessary user permissions
- Click OK to save
3.4 Configure SSH Server to Trust SecurITaas CA
- Locate SSH Configuration File:
- The SSH server configuration file is located at:
C:\ProgramData\ssh\sshd_config -
Note: This is the default location for Windows OpenSSH Server
-
Edit sshd_config:
- Open
C:\ProgramData\ssh\sshd_configin a text editor (Notepad, VS Code, etc.) - Important: You must run the text editor as Administrator to save changes
- Add the following line to the configuration file:
TrustedUserCAKeys C:\ProgramData\ssh\securitaas.pub - Note: Use the full path to the public key file
-
Save the file
-
Verify Configuration:
- Check that the line was added correctly:
Select-String -Path C:\ProgramData\ssh\sshd_config -Pattern "TrustedUserCAKeys" -
You should see the line you just added
-
Restart OpenSSH Server:
- Restart the SSH service to apply changes:
Restart-Service sshd -
Or use Services console:
- Open Services (services.msc)
- Locate OpenSSH SSH Server
- Right-click and select Restart
-
Verify Service Status:
Get-Service sshd - Status should show Running
3.5 Configure Provisioning User in Device Page
Before JIT provisioning can work, you must configure a provisioning user account in the SecurITaas Device page:
- Log in to SecurITaas Web Application:
- Access the SecurITaas web portal
-
Navigate to Devices page
-
Select or Add Target Windows Server:
- Locate the target Windows server in the device list
-
Or add a new device if not already registered
-
Configure Provisioning User:
- In the device configuration, specify a provisioning user account
- This can be:
- Local user account: A local Windows user account on the target server (e.g.,
provisioning-user) - Domain user account: A domain user account with appropriate permissions (e.g.,
DOMAIN\provisioning-user)
- Local user account: A local Windows user account on the target server (e.g.,
-
Requirements for the provisioning user:
- Must have permissions to add/remove users from local groups (for local group provisioning)
- Must have permissions to add/remove users from domain groups (for domain group provisioning)
- Should be a dedicated service account, not a regular user account
- Must be configured to allow passwordless SSH access (using certificate authentication)
-
Configure Group Membership:
- Specify which local or domain groups users should be provisioned to
- This is typically configured in the Access Rights or Device configuration
-
Users requesting access will be automatically added to these groups when they click "Connect"
-
Save Configuration:
- Save the device configuration
- The provisioning user will be used by SecurITaas to perform automated group membership changes
3.6 Verify JIT Provisioning Configuration
- Test SSH Certificate Authentication:
- From the SecurITaas appliance or a test machine, attempt to connect using an ephemeral certificate:
ssh -i <ephemeral_certificate> provisioning-user@<target_server_ip> -
You should be able to connect without a password if the certificate is valid
-
Verify Port 22 is Accessible:
- From the SecurITaas appliance, test connectivity:
Test-NetConnection -ComputerName <target_server_ip> -Port 22 - Or use telnet:
telnet <target_server_ip> 22 -
You should see the SSH banner if the port is open
-
Check SSH Server Logs:
- SSH server logs are located at:
C:\ProgramData\ssh\logs\sshd.log - Check for any authentication errors or connection issues
- Look for successful certificate-based authentication entries
3.7 How JIT Provisioning Works
Provisioning Flow (When User Clicks "Connect"):
- User Request:
- User logs into SecurITaas web application
- Navigates to Request Connection page
-
Selects target Windows server and clicks Connect
-
Session Establishment:
- Once provisioning is complete, user session is established
- User can now access the target server with appropriate permissions
Deprovisioning Flow (When Session Closes):
- Session Closure Detection:
-
SecurITaas detects when user session ends (RDP disconnect, logout, timeout, etc.)
-
Access Revocation:
- User is immediately removed from the group
- No standing access remains after session closure
- User must request access again for future sessions
Summary
With JIT provisioning configured:
- Automatic Access Management: Users are automatically provisioned and deprovisioned based on session requests
- Zero Standing Privileges: No permanent group memberships; access is only granted during active sessions
- Passwordless Operations: All provisioning operations use SSH certificate authentication
- Auditable: All provisioning and deprovisioning actions are logged and auditable
- Secure: Uses ephemeral certificates that are invalidated after use
5. Uninstall Trust from Domain Controllers
This section covers removing the SecurITaas trust configuration from domain controllers, including KDC certificates and CA certificates.
3.1 Remove KDC Certificate
To remove the KDC certificate from a domain controller:
Step 1: Identify the KDC Certificate
- Open Certificate Manager:
-
On the domain controller, open Certificate Manager:
- Press
Win + R, typecertlm.msc, and press Enter - Or open MMC and add the Certificates snap-in for Computer account
- Press
-
Locate the Certificate:
- Navigate to Personal > Certificates
- Identify the SecurITaas-issued KDC certificate
- Note the certificate's subject name (should match the DC FQDN) and thumbprint
Step 2: Remove the Certificate
- Delete from Certificate Store:
- Right-click the SecurITaas KDC certificate
- Select Delete
-
Confirm the deletion when prompted
-
Alternative Method - Using Certutil:
- Open Command Prompt as Administrator
- List certificates in the Personal store:
certutil -store My - Find the thumbprint of the SecurITaas KDC certificate
- Delete the certificate using the thumbprint:
Example:
certutil -delstore My <Thumbprint>certutil -delstore My a1b2c3d4e5f6g7h8i9j0k1l2m3n4o5p6q7r8s9t0
Step 3: Verify Removal
- Confirm Certificate Deletion:
- Refresh the Certificate Manager console
-
Verify the KDC certificate is no longer present in the Personal store
-
Restart KDC Service:
-
Restart the KDC service to ensure changes take effect:
net stop kdc net start kdc -
Repeat for All Domain Controllers:
- Perform these steps on each domain controller that had a KDC certificate installed
3.2 Remove SecurITaas CA Certificate from NTAuth Store
To remove the SecurITaas CA certificate from the Enterprise NTAuth store:
Step 1: Identify the CA Certificate
- View NTAuth Store:
- Open Command Prompt as Administrator
- List certificates in the NTAuth store:
certutil -viewstore NTAuth - Identify the SecurITaas CA certificate
- Note the certificate's serial number or thumbprint
Step 2: Remove from Enterprise NTAuth Store
Choose one of the following methods to remove the CA certificate from the Enterprise NTAuth store:
Method 1: Using Certutil (Command Line)
- Remove from Active Directory:
- On a domain controller or workstation with Domain Admin privileges
- Open Command Prompt as Administrator
- Remove the certificate from the Enterprise NTAuth store:
Replace
certutil -dspublish -f -del <CertificateSerialNumber> NTAuthCA<CertificateSerialNumber>with the serial number of the SecurITaas CA certificate -
Note: The
-delflag removes the certificate from Active Directory -
Alternative - Using Certificate File:
- If you have the certificate file, you can use:
certutil -dspublish -f -del securitaas-ca_<TIMESTAMP>.cer NTAuthCA
Method 2: Using Enterprise PKI (PKIView) - UI-Based
- Open Enterprise PKI Management:
- On a domain controller or workstation with Domain Admin privileges
- Start Microsoft Management Console (MMC):
- Press
Win + R, typemmc.exe, and press Enter
- Press
-
Add the Enterprise PKI snap-in:
- Go to File > Add/Remove Snap-in (or press
Ctrl + M) - Select Enterprise PKI from the list
- Click Add
- Click OK
- Go to File > Add/Remove Snap-in (or press
-
Remove Certificate from NTAuth Store:
- In the Enterprise PKI console, right-click Enterprise PKI
- Select Manage AD Containers...
- Navigate to the NTAuthCertificates tab
- Locate the SecurITaas CA certificate in the list
- Select the certificate
- Click Remove (or right-click and select Remove)
- Confirm the removal when prompted
-
Click OK to close the dialog
-
Verify Removal:
- The certificate should no longer appear in the NTAuthCertificates list
- Close the Enterprise PKI console
Step 3: Remove from Local NTAuth Store
- Remove from Local Registry:
- On each domain controller, remove the certificate from the local NTAuth store:
certutil -delstore NTAuth <CertificateSerialNumber> -
Or if you have the certificate file:
certutil -delstore NTAuth securitaas-ca_<TIMESTAMP>.cer -
Verify Removal:
- Verify the certificate is removed:
certutil -viewstore NTAuth - The SecurITaas CA certificate should no longer appear
Step 4: Remove from Trusted Root Certification Authorities (if applicable)
- Remove from Root Store:
- If the CA certificate was also imported to the Trusted Root Certification Authorities store:
certutil -delstore Root <CertificateSerialNumber> -
Or:
certutil -delstore Root securitaas-ca_<TIMESTAMP>.cer -
Verify Removal:
- Verify the certificate is removed:
certutil -viewstore Root
Step 5: Wait for Replication
- Active Directory Replication:
- Wait for Active Directory replication to complete (typically a few minutes)
-
The removal will replicate to all domain controllers automatically
-
Verify on All Domain Controllers:
- On each domain controller, verify the certificate is removed:
certutil -viewstore NTAuth
6. Uninstall Credential Provider from Target Windows Servers
This section covers uninstalling the SecurITaas Credential Provider from target Windows servers.
4.1 Uninstall Using securitaascpinstaller and Perform Cleanup
To completely remove the SecurITaas Credential Provider from a target Windows server:
Step 1: Run the Uninstaller
- Open Command Prompt as Administrator:
- Log in to the target Windows server
- Right-click Command Prompt and select Run as administrator
-
Important: The uninstaller must be run with Administrator privileges
-
Navigate to Installer Directory:
-
Change to the directory containing
securitaascpinstaller.exe:cd C:\Path\To\Installer -
Execute Uninstallation:
- Run the uninstaller with the following command:
securitaascpinstaller.exe uninstall -
Alternative syntax (also supported):
Or:securitaascpinstaller.exe /usecuritaascpinstaller.exe -u -
Monitor Uninstallation Process:
- The uninstaller will perform the following operations:
- Unregister the DLL (COM unregistration)
- Remove Credential Provider from Windows registry
- Delete
RDPQRProvider.dllfromC:\Windows\System32\ - Remove configuration registry entries
-
You should see progress messages for each step
-
Verify Uninstallation:
- The uninstaller will display "Uninstallation Complete!" when finished
- Note any warnings that may appear (some are non-fatal)
Step 2: Restart the Server
- Restart Required:
- Important: You must restart the server for all changes to take effect
- The uninstaller will display: "IMPORTANT: You must restart your computer for changes to take effect!"
- Restart the server:
shutdown /r /t 0
Step 3: Manual Cleanup (if needed)
After restart, perform additional cleanup to ensure complete removal:
- Verify DLL Removal:
- Check that
RDPQRProvider.dllis removed from System32:dir C:\Windows\System32\RDPQRProvider.dll -
The file should not exist (you'll get a "File Not Found" error)
-
Verify Registry Cleanup:
- Open Registry Editor (regedit.exe)
- Check that the following registry paths are removed:
HKEY_LOCAL_MACHINE\SOFTWARE\SecurITaas\CredentialProviderHKEY_LOCAL_MACHINE\SOFTWARE\Microsoft\Windows\CurrentVersion\Authentication\Credential Providers\{8B5C9F21-3A4D-4E2F-9C1B-7A8E6D5F4C3B}HKEY_CLASSES_ROOT\CLSID\{8B5C9F21-3A4D-4E2F-9C1B-7A8E6D5F4C3B}
-
If any of these keys still exist, delete them manually:
- Right-click the key and select Delete
- Confirm deletion
-
Verify Credential Provider Removal:
- After restart, log out or lock the server
- At the login screen, verify that "Logon using Securitaas" option is no longer present
-
Only standard Windows authentication options should be available
-
Check for Residual Files:
- Search for any SecurITaas-related files:
dir /s C:\Windows\System32\*SecurITaas* dir /s C:\Program Files\SecurITaas dir /s C:\ProgramData\SecurITaas -
Delete any found files or directories
-
Check Event Logs (Optional):
- Open Event Viewer (eventvwr.msc)
- Check Application and System logs for any SecurITaas-related errors
-
These should be minimal after successful uninstallation
-
Re-enable Network Level Authentication (Optional but Recommended):
- If you disabled NLA during installation, you may want to re-enable it for security:
- Open System Properties (sysdm.cpl)
- Navigate to the Remote tab
- Under Remote Desktop, check the option "Allow connections only from computers running Remote Desktop with Network Level Authentication"
- Click OK to save
- Note: This will require users to authenticate before seeing the logon screen, which is more secure but prevents QR code authentication
Step 4: Repeat for Additional Servers
- Repeat steps 1-3 for each target Windows server that has the SecurITaas Credential Provider installed
Troubleshooting
Common Issues
- KDC Certificate Not Working:
- Verify the certificate is in the Personal store with correct intended purposes
- Check that the certificate hasn't expired
- Ensure the KDC service is running
-
Verify the certificate subject name matches the DC FQDN
-
CA Certificate Not Replicating:
- Wait for Active Directory replication (can take up to 15 minutes)
- Manually trigger replication if needed
-
Verify Domain Admin privileges are being used
-
Credential Provider Not Appearing:
- Ensure the server has been restarted after installation
- Verify the DLL is registered correctly
-
Check Event Viewer for errors related to credential providers
-
Uninstallation Incomplete:
- Ensure you're running as Administrator
- Manually delete registry entries if needed
- Restart the server after manual cleanup
Verification Commands
-
Check KDC Certificate:
certutil -store My -
Check NTAuth Store:
certutil -viewstore NTAuth -
Verify Credential Provider Registration:
reg query "HKLM\SOFTWARE\Microsoft\Windows\CurrentVersion\Authentication\Credential Providers\{8B5C9F21-3A4D-4E2F-9C1B-7A8E6D5F4C3B}"
Additional Resources
- Microsoft Documentation: Import third-party CA to Enterprise NTAuth store
- SecurITaas Certificate Utility documentation
- SecurITaas Credential Provider installation guide
Summary
This guide covers:
- Configuration: Setting up domain controllers and target Windows servers for SecurITaas FIDO authentication
- Installation: Installing KDC certificates and Credential Provider
- Uninstallation: Removing all SecurITaas components and trust relationships
Always ensure you have proper backups and test in a non-production environment before applying changes to production systems.